
Seeds & Seed Starting
Posted by Val Thies and Jessie Jacobson on Feb 21st 2023
Starting seeds indoors gives you a jump on the growing season and also the chance to grow whatever varieties you can get your hands on! It’s really easy. All you need is a few simple supplies, basic knowledge, and seeds. Start small. Build on your seed starting routine as you gain experience and confidence starting seeds indoors.
First, a Few Definitions:
Organic—seeds grown without pesticides, herbicides, or synthetic fertilizers.
Heirloom—seed varieties that are at least 50 years old. Each variety has its own unique story. You can collect and save these seeds to use for the next season. Heirlooms are never hybrid seeds.
Open-pollinated—seeds that are produced from a random pollination by wind, birds, insects, or other natural ways.
Hybrid seeds—controlled cross-pollination of two differing plant parents to create a new variety based on desirable characteristics such as yield, disease resistance, growth habit etc. If seeds are collected from mature plants, they may not produce the same plant.
When to Start Seeds Indoors
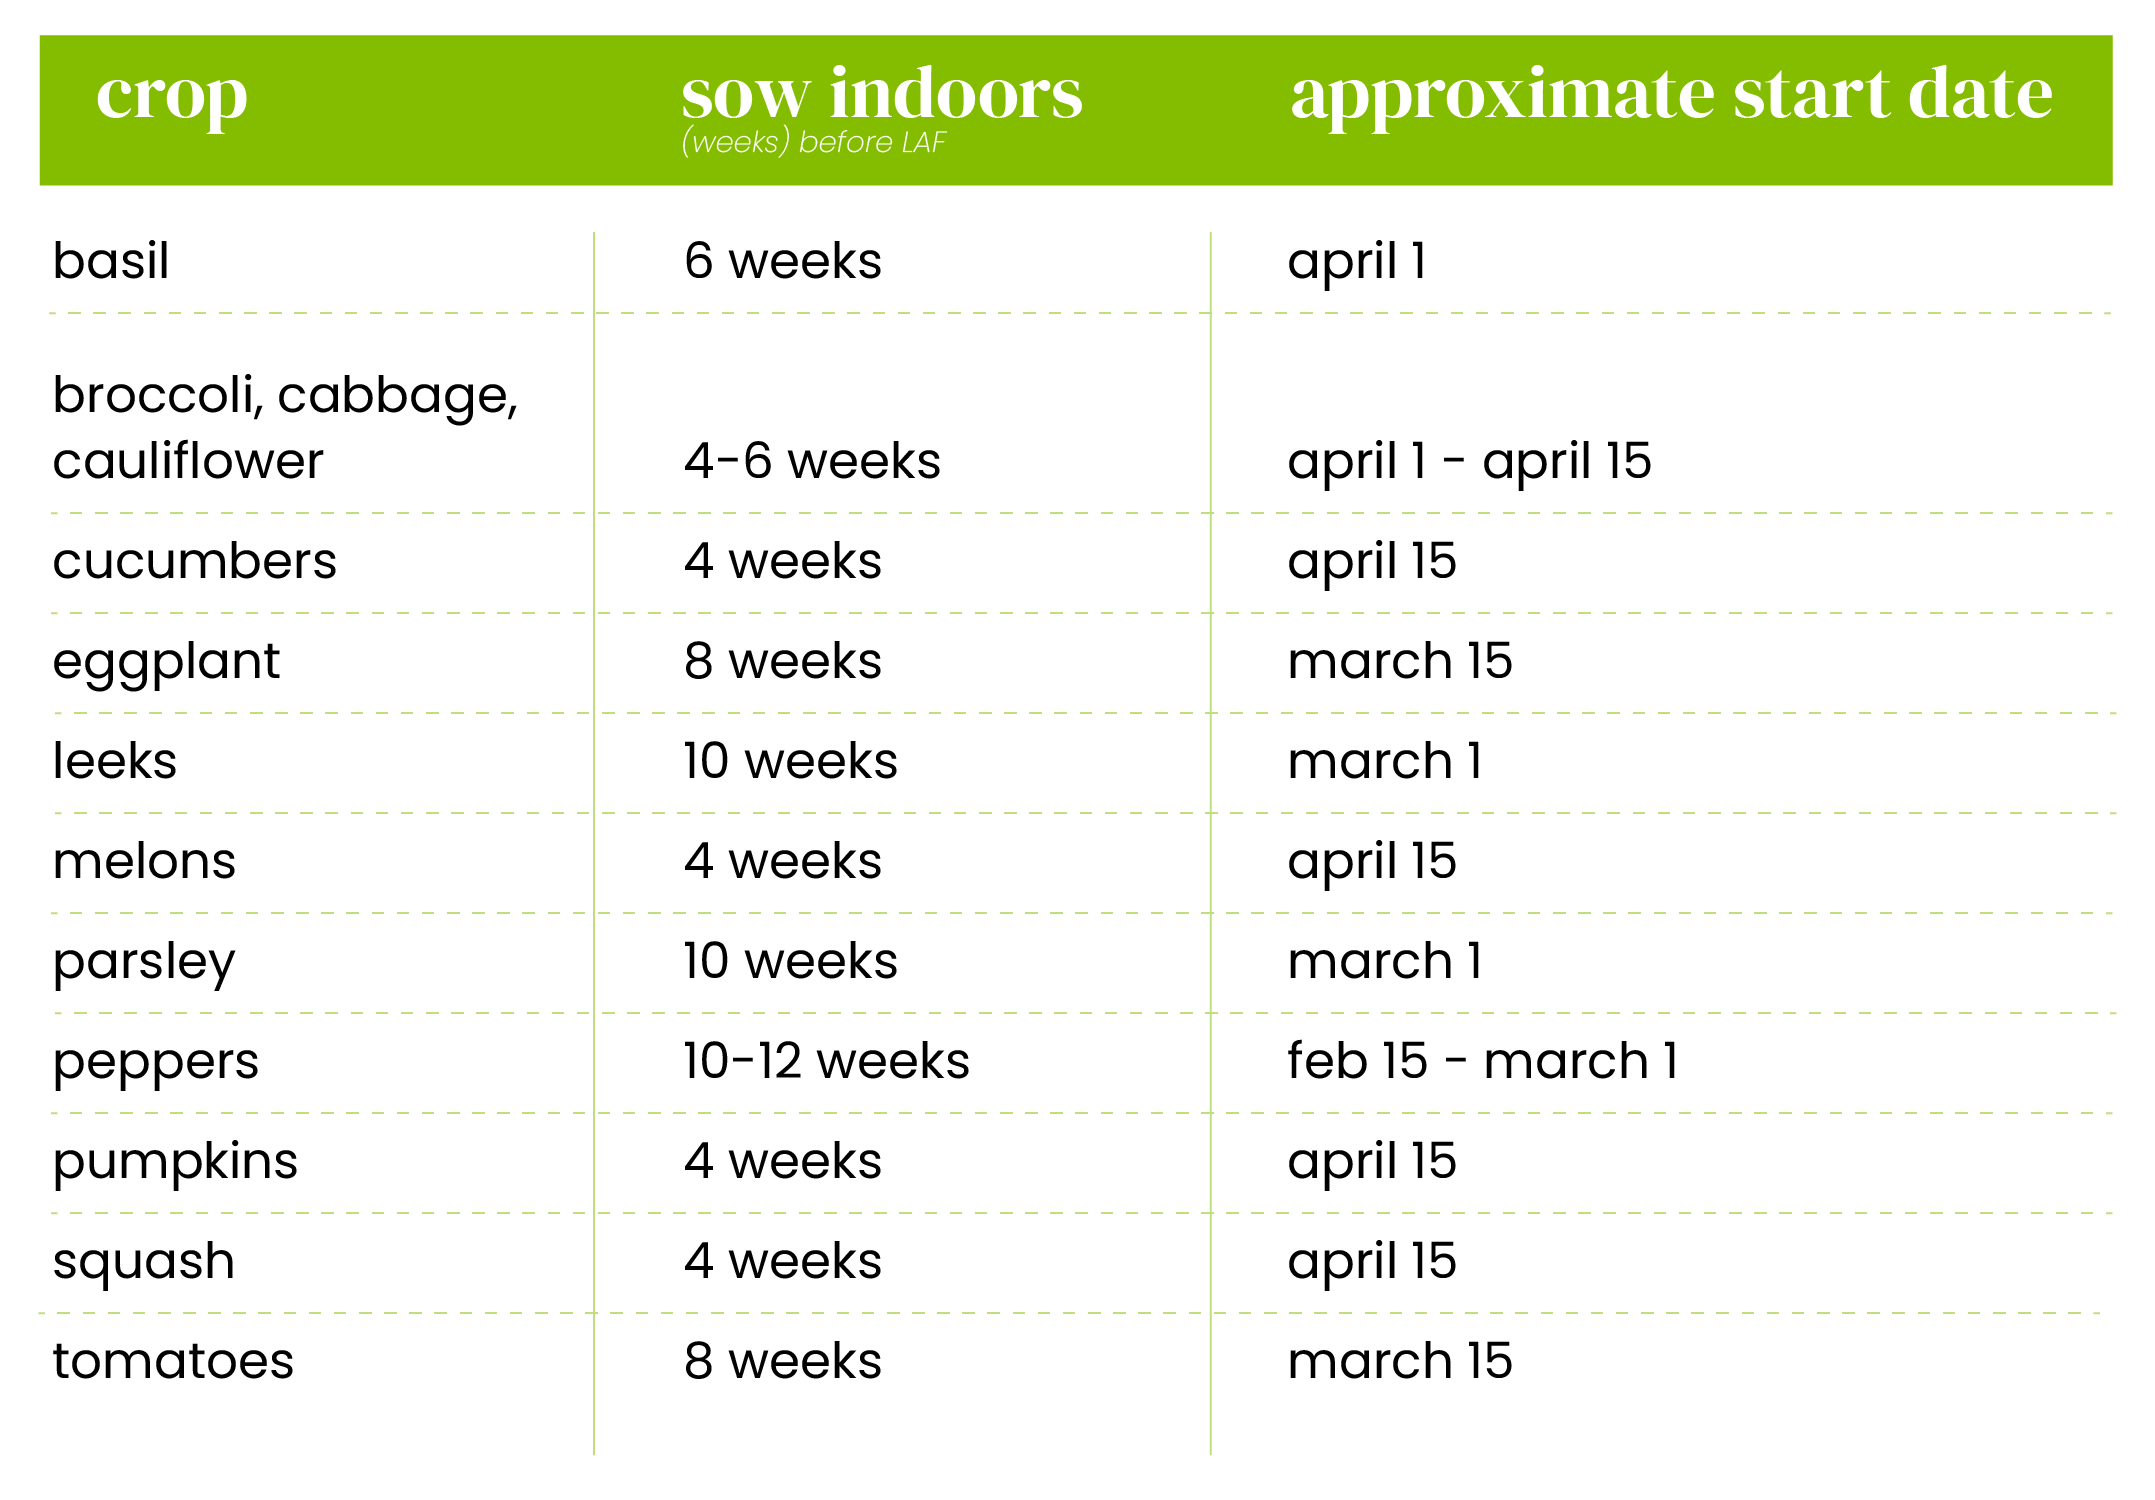
Start seeds indoors based on the number of weeks it takes seedlings to grow to a transplantable size outdoors. Seed starting dates are based on our last average frost.
In our area, our last average frost (LAF) is May 15th. This handy dandy chart will guide your seed starting journey.
Gather your Supplies
- A seed starting kit
- Espoma’s Organic Seed Starting Soil
- Plant Labels
- Spray bottle and watering can
- Grow lights or 4-bulb fluorescent light, a mixture of cool and warm tones (optional)
- Heating Mat (optional)
Sow your Seeds
- Begin by adding water to your seed starting mix. It should be thoroughly damp, but not super wet, before adding seeds.
- Mix water and seed starting mix in a pail or container, then add mix to the cells or pots.
- Next plant your seeds at the right depth. You can check the back of the seed packet to find the planting depth. A general rule is to plant them twice the depth of the seed’s diameter.
- If using peat pellets, add water to the tray until they have expanded to their full size. This can take 15-30 minutes. Plant two seeds in each cell and pinch to cover seeds with soil.
- Label your seeds so you remember what you planted!
Humidity and Water
- Lightly mist/spray the soil surface with water to snuggle your seeds in for germination.
- Cover your new seedlings with plastic wrap or a plastic dome while seeds germinate to keep the humidity high and moisture in.
- Remove the cover once you see shoots poking up through the soil to allow air flow.
- Mist seedlings with a spray bottle or bottom water to keep your medium moist without overwatering.
- Check the plants once per day to see if water is needed.
Heat and Light
- Newly planted seeds do not need light to germinate. Place them on top of the refrigerator or on a heat mat for added warmth.
- Once seedlings have emerged, they will need a light source. Fourteen hours of light is optimal, but a sunny window is often enough light for the plants to grow. Remember to rotate your container so they can receive even light.
- If natural light is not enough, you can supplement with an additional light source. A grow light or inexpensive 4-bulb fluorescent light placed a few inches above the top of the seedlings will provide the light needed for optimal growth. Keep lit for 14 hours each day; raise the light as the plant grows.
Air Circulation and Fertilization
- Good air circulation will create strong seedlings and prevent many diseases. A fan set on low, but not directly blowing on the seedlings, will help with this.
- Your seed starting mix should contain enough nutrients for 4-6 weeks, but peat pellets will need a low dose of slow-release organic fertilizer added every 3-4 weeks. Espoma’s Plant Tone is an excellent option. Neptune's Harvest Fish Fertilizer is another great option, but it’s stinky!
Troubleshooting Problems
- Damping-off is when the stem diminishes and the seedlings collapses as the result of a fungal infection. This is caused by botrytis, a fungus that occurs when a plant is overwatered or exposed to excessive amounts of humidity. While there is nothing you can do fix this problem once it has occurred, you can prevent it from happening. Make sure you use a sterile seed starting mix, like Espoma Organic Seed Starting Mix. Provide good air circulation and remember not to overwater. If you notice one or two of your seedlings collapsing, carefully remove them and let your medium dry out.
- If your plants are leggy or spindly, check the lighting. It most likely means your seedlings are stretching to reach more light. Move them closer to light or provide a grow light mounted a couple of inches above the top of the seedlings. Once plants are bigger, make sure they are not touching each other or fighting for the same light.
Save some seeds to directly sow in the garden...
Many crops can be grown from seed, but do not need to be started indoors ahead of the season. In our area, these include beets, carrots, basically any root vegetable, leafy greens such as lettuce or arugula, and spinach, peas, and beans. These can be started directly in your soil once it dries out and warms up. Usually, late April or early May in our region.
As you begin your seed starting journey, let us know if you have any questions. We have so much seed starting experience on staff. More veggie gardening blogs to come!
See you at Tonkadale!